Scrap SMART- Step 5: Organize your photos!
Let’s start with step by step instructions on how to organize and store your photos!
Step 1- Start by thinking an “A” photo is album worthy! It is one of the best photos I have! A “B” photo is good, but not the best. You can archive or “save” these and a “C” photo can be deleted or tossed. Thirty years ago, people would almost cry before they would throw away a photo! We felt that if we paid for it, we HAD to keep it for some reason. It is very FREE-ING to let that stuff go! You kept it because you didn’t feel you had time to sort it. Now you do, and you need to TRUST ME HERE and toss! I am giving you permission if you need permission…toss it! The duplicates, the duds, start there… they are easiest.
Whether that is deleting pictures from your computer or camera or putting physical photos in the trash, you can do it! I used to run to the store to rip open my package of photos and see what I took! Often I had duplicates of everything. Some were good shots and some were lousy. TOSS THE LOUSY ONES. You will get better at this! I used to take a couple photos of the same thing, trying to get the best light or angle or get someone to smile. Toss the duplicates and keep JUST THE BEST ONES.
This will do a couple of things. Your albums will look better, because you are only using the BEST photos, and you will be handling LESS of everything. Less photos, means less pages, less paper, less adhesive, less overall cost. If I have a couple good shots of the same event or person, I can choose to layer 3 photos to tell the story or put the BEST one in, and archive the others in a Photo Box to give to the album recipient later.
When you have kids at home, they often needed photos to complete a project. Remember your autobiography project? Create an archive photo box for each child and slip in those extras. When you have removed the BEST photos, you don’t have to worry…you already have your favorites! This keeps everyone happy!
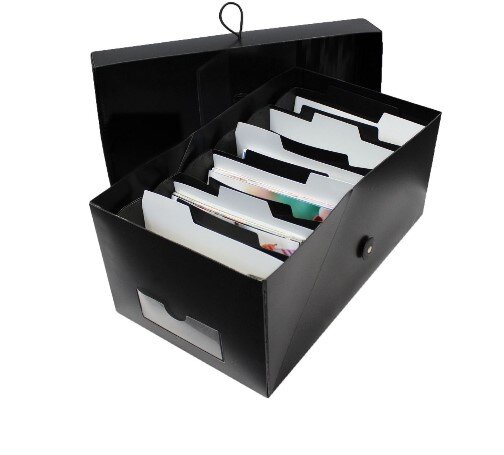
Step 2- You need something to put those photos in! You will need photo boxes and dividers for this step. I use the Power Sort Box from Creative Memories. This handy magical box is the key to preparing your photos for scrapbook pages or photo albums the right way. This beauty will not only organize your photos, but it will also protect them from light and dust, too. Including 6 compartment boxes and 6 dividers for easy sorting and labeling, you'll always have just the photos you're looking for right at your fingertips. And, they'll be in perfectly perfect condition!
What I love is that you can remove a compartment and work with the photos in that one section, one at a time. You can seal it with the lid for protection. Each side of the lid loops around a button to secure your photos, in case they are dropped, they don’t scatter all over the place and you lose the time you spent organizing! The boxes are water repellant and hold up better than paper type boxes do. I have had mine for years and they are in great shape. They are modular, so you can stack them in a closet when you have tight storage space and there is a insert to label in front of the box. It’s a winner!
Holds 1,200 4x6 or 5x7 photos
Includes 6 black compartment boxes
Includes 6 Power® Sort Dividers
Inside Cover holds photos and memorabilia up to 12.75" x 7"
Made of polypropylene, a safe plastic for photos
Overall size is 13"x7.75"x5.75
Photo-safe (acid-free, lignin-free)
You can purchase your Power Sort Boxes here.
How to prep for those those Power Sort Boxes…
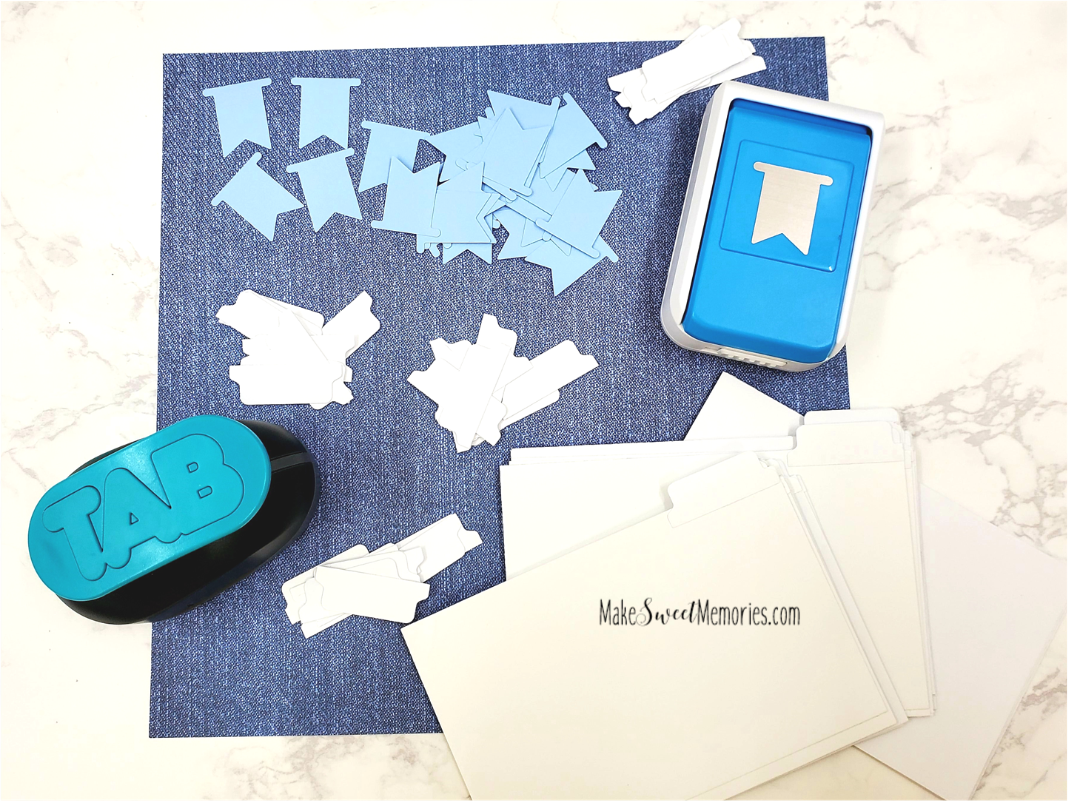
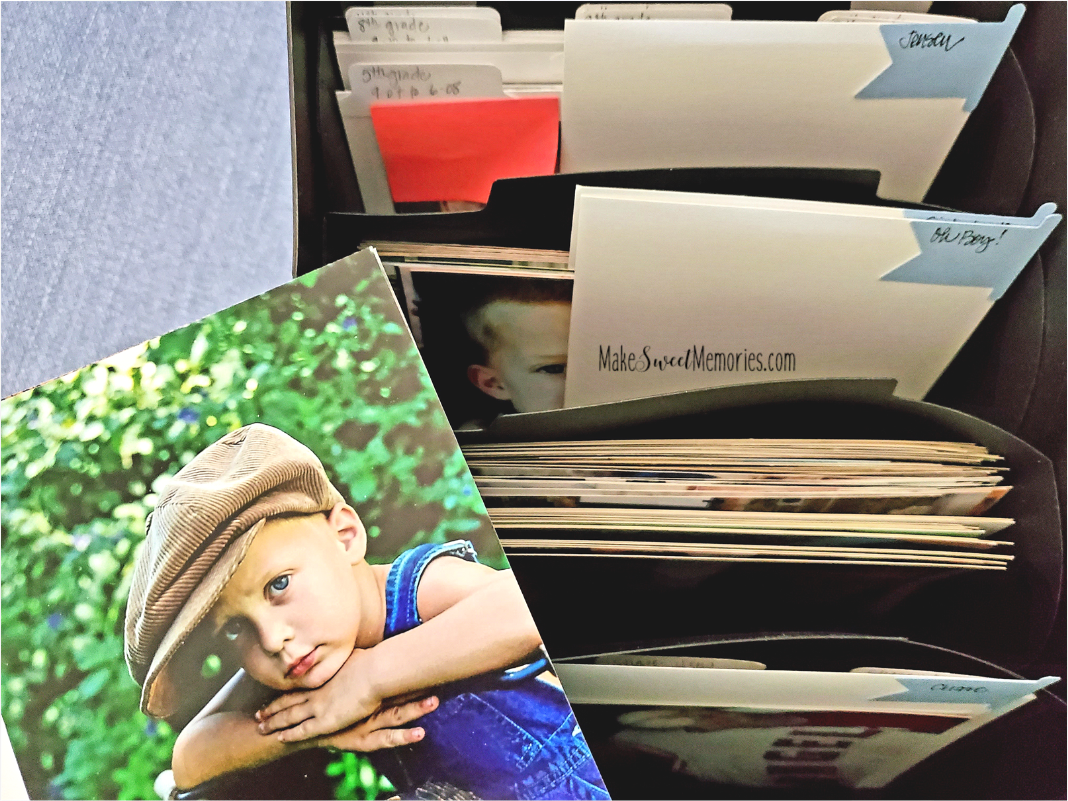
Step 3-One thing I did that was really helpful, was to sit down and make up some extra dividers for my boxes. The Power Sort Boxes come with 6 plastic dividers, but I needed more. To make your own dividers: I started cutting my white 12x12” cardstock in pieces that were about 6.75”wide x 4.375”high. I could get a few out of one sheet of paper. I purchased a TAB punch here and punched little tabs I could adhere with tape runner to the top of those dividers. I used some little pieces of scrap white cardstock I had to punch out the tabs for each of them. I spaced them out so some were justified to the left, some centered and some to the right, so I could easily see them. After I cut the 6.75”x 4.375” pieces for my dividers, I had a leftover piece of white cardstock that was about 4.375”W x 5.25”H.
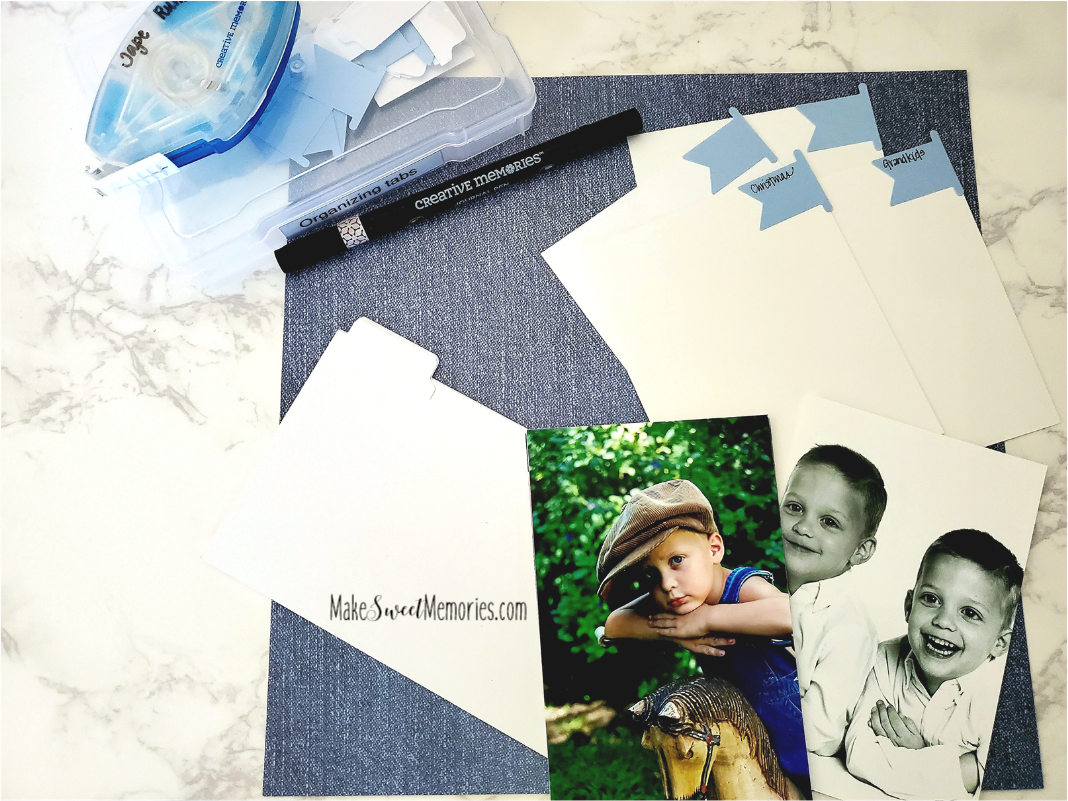
I had a banner punch from Creative Memories that I used to punch blue tabs to stand out on those pieces of leftover white cardstock. I used some tape runner to adhere those banners onto my cardstock and set them upright in each pod. This worked really well for me. You can use any punch that you have to make uniform cuts or just free hand a banner. If you have the old Circle punch from CM, you could fold it in half and use that as a tab. The blue tabs were the main categories and the white dividers were placed behind them for easy sorting. Punch a bunch of these and slip them into the back pod so they are handy to grab when you need one! Making these ahead of sorting time helped keep the sorting process flowing!
Step 4- You need to decide how you will sort- will your categories be chronological by dates or do you want to group your photos in themes? That is totally up to you! Consider your Scrap Journal and what projects you want to make and how best to sort for them. WRITE THEM DOWN! If you have digital images you want to add to your album, use a keyword and label each photo you want in the album with that keyword. Then you can sort them easily and find the ones you want to print. (You can see a video on my Facebook page showing how I did this myself.) Once you have your organizing structure in place, you can make a lot of progress!
Step 5- ENJOY THIS! You are creating your family history and when you have a simple system in place, your brain LOVES it! You will be propelled back to continue! There is something about organizing that is so satisfying! You know what you have and you know where it is! Set aside time for this in your calendar and you will fall in love knowing how to organize for a scrapbook! Record your scrapbook ideas in your Scrap Journal as you go- and your categories will evolve naturally!
How to organize your digital images!
What is the best way to organize digital pictures? It’s a question many people are asking! I purchased a digital camera in 2005 and started taking even MORE pictures than before! Is that possible? I added thousands more and knew I needed a system to organize them. I have a PC so I started using a program called Memory Manager, which was updated and is now called Historian. I love this program!
The first thing you need to do when you want to start organizing is find a program that will automatically sort your photos in chronological order for you. Historian does that for PC computers. Apple photos should work for MAC users. Then you need to gather ALL your media and put it in one place. Photos from social media, flashdrives, disks, cd’s, external hard drives- wherever you have put your photos..they all need ONE home. This is a critical place to start!

If you can’t locate your photos in about 3 clicks of a mouse, you need to improve your system.
It should only take a few seconds to get into your photos, then you can spend some time sorting them. “A” photos are album worthy- they are your VERY best ones! “B” photos are good but not your best and you may use some of them, archive them or give some away and “C” photos are to be deleted. The more you delete, the easier it becomes. Remember you are looking for your VERY BEST photos. We have all taken more than we need to store, so start sifting through them!
When you go back to the Scrap Journal and look at what type of albums you want to create and identify what album is your #1 priority. Start here. Make a folder for 2020 and put all the photos you took in 2020 in that one folder. Label it “2020 not filed”. Open it up and start deleting the obvious ones that don’t need to be saved. You will be left with mostly “A” and “B” photos. Look for the photos that you want to use for that #1 priority album. If it is an “A” photo, you will want to tag it with a keyword that corresponds to the album. You can group your photos together and tag them at once with the keyword. Create a folder that has the same keyword and place all those images within that folder.
Work through each year this way until you have sorted all the images for the project. Go back into the folder and look them over carefully to decide which of those photos you will make time to edit and print.
You won’t be using all of them, just your best! As you organize the images, your folder that says “2020 not filed” will decrease in size. Each time you stop and start, you will know EXACTLY where to go to sort your images.
I love Historian because it has several features that help me create more personal albums. One is the TELL YOUR STORY section:

When I loaded in the pictures from the game, I wrote what happened on a couple of them. Jensen got the game ball and it was a big deal for him! I could never have remembered all these details even a week or two later. I LOVE this feature! Journaling this in his book will make it so much more personal for him. If you have a group historical shot, you can label who is in the picture once and never have to worry about it again! You can write anything you want to and that information is tagged to the photo and stays with it. You can also rate the photo as a 4 star or 5 star photo. Then you can sort by 4 star photos and only those 4 star photos pop up on the screen. I LOVE things that save me time!
When you scan in a photo, you can change the date to be sure it sorts chronologically as it should. I have a FAMILY tab, and a folder for each member of our family under it. IF I were to be making 3 albums for Jensen, lets say a Sports Book, a Scout Book and a School Book, I would use a keyword for each album and label the photos I want to use with that same keyword.
Historian will sort, organize, edit and brighten photos and even clone out things you don’t need in your photo! If you want to learn more about HISTORIAN click here. You can use a trial version to check out the features for yourself before you purchase. (This program is offered by a company called Forever. Contact me before you purchase this software, I can give you a $20 off coupon toward your first purchase and save you some money!) Forever has amazing customer service and can help you as you get started. They have some free training and ongoing training you can purchase for a nominal monthly fee. Call 1-888-367-3837.