Craft Room Organization: Organizing your Paper!
You’ve tried to keep things organized but your paper has made its way to several different places! Do you know how much Christmas paper you have on hand? How many sheets of green and red paper? Can you get your hands on it right now or will you have to spend some time searching…? There is a better way to organize your scrapbook paper! My friend showed me how she organizes her 12x12 scrapbook paper and it has been life changing for me! Now all my paper is in ONE place, I can get exactly what I need in seconds, and I KNOW where it goes after I am done, PLUS its EASY to clean it up! Don’t you LOVE to declutter your craft space? The best part is I am actually USING what I have! Sound to good to be true? It’s really very simple. The key is Creative Memories Power Project Folders! Let me show you how I use them! There are four easy steps!

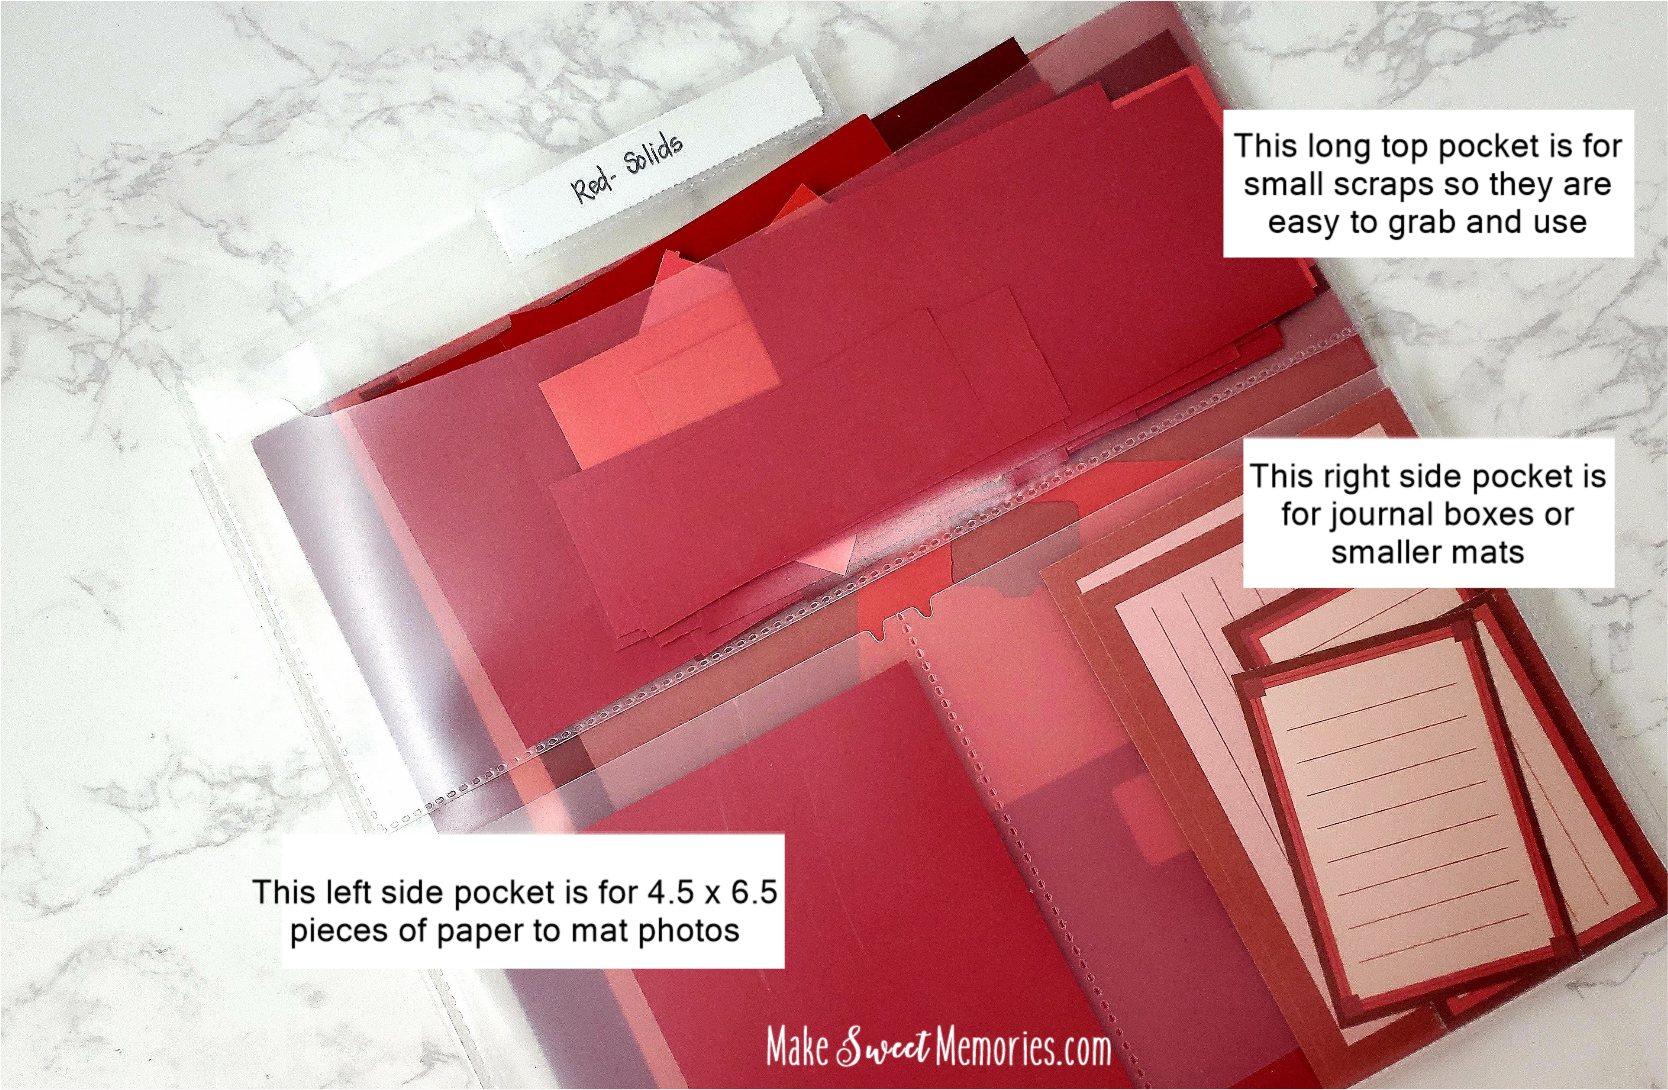
These Power Project Folders from Creative Memories come four to a set. It’s a little tricky to see here, but they have pockets sewn in that divide up the space. ON the front, there is a long top pocket and a shorter, wider pocket on the bottom left and right. These will keep your papers separated. There is a long pocket on the top to load up your scraps and small pieces so they don’t get lost and are easy to use and return! When you just need a little piece, it is right there for you! The RIGHTSIDE POCKET always holds your journaling boxes in the appropriate color. No more hunting around in other areas for those! They are right there when you need them! The LEFTSIDE POCKET will hold pieces of paper that you could mount a 4x6 photo without trimming. I use the 4.5 x 6.5 photo mats that Creative Memories sells and slip those pieces in the LEFT pocket. If you ALWAYS put those things in the pockets designated, you will not have to hunt for them, and you will know when you need to order more!
When ALL YOUR PAPER is in one place, you know you are using what you have already invested in. We don’t just want to collect paper, we want to use what we have! I sort three ways: 1) By COLOR 2) By THEME 3) By SEASON
The first thing to do is gather all your paper together! Pull it out from wherever it is!
#1-You will start by organizing by COLOR. This means all the colors of the rainbow.
You will want to order some Power Project Folders so you have someplace to put your papers in as you move through them. You can order those folders right here. (Just put Power Project folders in the search to find them.) Some people put their RED SOLIDS and their RED PRINTS together in one folder. I have been scrapbooking for 30 years and have saved my scraps! I have a lot! So I needed a separate folder for all the solids and all the prints in each color. Red, Pink, Yellow, Orange, Green, Blue, Purple. I have a separate folder for Browns/Neutrals and one for Black and one for White. You decide how you want to group your papers together according to how much paper you have on hand. They do look so pretty when you put them on a shelf in rainbow colors! You will love looking at them all organized, ready to go!

I purchased some cubes to store my Power Project folders in. This way, everything doesn’t slide over when you take out a folder. I like them a lot, and they are stuffed full! You could use several things to store your paper in. If you have a Creative Memories Storage and Display Tote, you might want to store it in there. It is taller than the folders, so they fit in well and you can seal it up, so it is stackable, which is nice. It also has a repositionable divider in it, which will help your folders stand up straight. It depends again, on how much paper you have and what works for your storage space.

You can see there are several ways to use this! It is 15” x 9” x 14.5” and will hold a lot! There is an adjustable divider and zippered lid with handles on the side to carry it. These are modular, so they can be stacked.

This tote can be used for storing other supplies or taken with you when you scrapbook somewhere else. If you like modular storage, you may want to pick some up or add it to your wishlist!


#2-Organize by THEME
I have several folders that are organized by theme. Christmas is a big one! It is a little hard to see here in the picture, but on the BACKSIDE of the folder, there are two pockets with a seam dividing it in the middle. On the LEFTSIDE pocket, I always put the stickers that coordinate with this collection or theme. On the RIGHT SIDE pocket, I put the laser borders that match or any borders I have created in here. You could also slide in long pieces of paper that you know you could use in the Creative Memories Bordermaker system. These back pockets are about 6 inches wide by 12 inches tall. Other themes I have include BABY, KIDS, SCHOOL, SPORTS, VACATION, etc. This way when I am working on a project, I grab that folder and just use what is there. I love that all the little embellishments can fit in that top long pocket on the front side with my small scraps of paper, my stickers are there, and those laser border strips that I love are all together in one place. This makes it really nice when you are traveling too- just grab those folders you need to take them with you!
#3- Organize by SEASON
Another way to organize is by season: Spring, Summer, Fall and Winter. I have some miscellaneous collections or small pieces that I can gather together and put in one folder. This works really well! As you keep working on your stash of paper, it will diminish and you can put those scraps in here! When you KNOW what you have, you USE it!
